-
Shunhua Road, Jinan City, Shandong
Best Laser Settings for Cutting Acrylic Without Burning
Acrylic does not burn because the universe hates you. It burns because your heat input, smoke removal, focus position, masking, and sheet chemistry are fighting each other. Here is the hard, testable way to tune laser cutting acrylic settings without guessing.
The Ugly Truth About “Perfect” Laser Cutting Acrylic Settings
There is no universal acrylic setting.
That sentence irritates buyers, machine sellers, and half the YouTube tutorial crowd, but it is still true because acrylic edge quality is not controlled by wattage alone; it is controlled by absorbed energy per millimeter, focal geometry, airflow, exhaust speed, sheet chemistry, masking, bed reflection, and how honest the operator is during test cuts. So why do people still ask for one magic number?
Because bad charts are comforting.
When we talk about laser cutting acrylic settings, we are usually talking about PMMA — polymethyl methacrylate, repeat unit C5H8O2 — cut with a CO2 laser at roughly 10.6 µm. Clear acrylic absorbs CO2 laser energy well, which is why a CO2 laser cutting machine makes more sense for most transparent acrylic work than a blue diode laser. Blue diode systems can work on dark or coated acrylic, but clear acrylic is often a humiliating material for them.
Here is my hard opinion: most acrylic burning is not a “settings problem.” It is a process-control problem disguised as a settings problem.
The 2024 NIOSH-indexed study on desktop laser cutter emissions tested materials, current levels, and ventilation conditions, and found that material choice, laser current, and ventilation all significantly changed respirable particulate emissions. The same study reported that exhaust ventilation reduced respirable particles and removed gaseous contaminants during cutting and engraving, which is exactly why “just lower the power” is a shallow answer when smoke is sitting in the kerf like a chemical blanket. Read the 2024 CDC/NIOSH-indexed desktop laser cutter emissions study.

Table of Contents
The Starting Settings I Would Actually Test First
For acrylic, I usually start with the cleanest cut strategy: high enough power to get through in one pass, enough speed to avoid heat soak, low-to-moderate air assist, strong exhaust, and focus at the surface or slightly into the material.
Slow cutting feels safe. It is not.
Acrylic burns when heat lingers, vapor has nowhere to go, and smoke redeposits on the edge; the operator then slows down further, thinking the laser “needs more time,” and the edge gets browner, wider, stickier, and uglier. See the trap?
Use this as a first-pass test matrix, not gospel. Your tube age, lens condition, bed type, controller calibration, acrylic brand, cast-vs-extruded chemistry, and lens focal length can move these numbers by 20–40%.
| Acrylic Type & Thickness | CO2 Laser Power | Starting Power | Starting Speed | Air Assist | Focus Position | What I Expect |
|---|---|---|---|---|---|---|
| Cast acrylic, 2 mm | 40W–60W | 70–85% | 12–20 mm/s | Low, clean air | Surface | Clean edge, little haze |
| Cast acrylic, 3 mm | 60W–80W | 75–95% | 10–18 mm/s | Low to moderate | Surface to -1 mm | Glossy edge if exhaust is strong |
| Cast acrylic, 5 mm | 80W–100W | 85–100% | 6–12 mm/s | Moderate | -1 to -2 mm | Slight edge warmth, still clear |
| Cast acrylic, 8–10 mm | 100W–150W | 90–100% | 2–6 mm/s | Moderate, not violent | Mid-thickness bias | Needs careful smoke control |
| Extruded acrylic, 3 mm | 60W–80W | 65–85% | 12–22 mm/s | Low | Surface | More melt risk than cast |
| Mirrored acrylic, 3 mm | 60W–100W | 75–95% | 8–16 mm/s | Low | Acrylic side, not mirror back | Test orientation first |
If you want a machine-side reference, Bogong’s laser cutting machine for acrylic page is a sensible internal match for this article because it already frames acrylic cutting around clean edges, transparency, and commercial applications. Their acrylic and plastic laser cutting page also mentions guideline settings and the need for test cuts, which is the right mindset for any serious operator.
Power, Speed, and the Acrylic Burn Equation
The setting that matters is not power. It is energy density.
Here is the rough shop logic:
Heat input per millimeter ≈ laser power ÷ cutting speed
That means 90W at 10 mm/s can overheat the same acrylic more than 60W at 14 mm/s, depending on focus and kerf evacuation. People love talking about wattage because it is printed on the machine. But acrylic listens to energy, smoke, and time.
For best laser settings for acrylic, I want a narrow kerf, a clean lower edge, and no brown vapor stain on the top surface. If the bottom does not separate, I do not automatically slow down. First, I check focus, lens cleanliness, mirror alignment, sheet flatness, and exhaust draw. A half-dirty 2-inch lens can make a 100W tube behave like a drunk flashlight.
The 2023 ACS Chemical Health & Safety paper on CO2 laser cutting PMMA specifically investigated particulate and gas emissions from cutting acrylic sheets with a 60W compact laser cutter, which matters because PMMA vapor is not harmless “craft smoke.” See the 2023 ACS study on CO2 laser cutting acrylic plastics.
So yes, the edge is cosmetic. But the process is chemical.
Air Assist Is Not a Leaf Blower
Air assist does two jobs: it clears vapor from the kerf and reduces flare-ups.
That is all.
The mistake is blasting acrylic with too much air, then wondering why the edge turns frosty instead of flame-polished. Acrylic likes a controlled vapor channel. If you hit the kerf with aggressive air pressure, you cool the molten edge too fast, disturb the vapor plume, and sometimes drive smoke back onto the surface. The result looks like someone sanded the edge with dirty breath.
For acrylic laser cutting air assist, I would test in this order:
Low Air for Glossy Edges
Start around 5–10 psi on thin cast acrylic, assuming your compressor is dry and oil-free. The goal is smoke displacement, not forced cooling.
Moderate Air for Thick Sheet
Move toward 10–15 psi when cutting 5 mm or thicker acrylic, especially when the kerf starts trapping vapor. If the edge loses gloss, step down.
Strong Exhaust Before Strong Air
A rear or downward exhaust system should pull vapor out of the chamber before it stains the sheet. If your machine smells like hot MMA monomer after every cut, the fume path is not doing its job.
OSHA lists methyl methacrylate — CAS 80-62-6 — with an OSHA permissible exposure limit of 100 ppm as an 8-hour time-weighted average, and NIOSH also lists a 100 ppm recommended exposure limit. That does not mean “smelling acrylic is fine.” It means shops should treat acrylic fumes as occupational exposure, not ambience. Check OSHA’s methyl methacrylate chemical data.

Cast Acrylic, Extruded Acrylic, and Why One Burns Dirtier
Cast acrylic usually cuts cleaner.
Extruded acrylic often melts more, gums more, and leaves a less elegant edge because its internal stress and manufacturing behavior differ from cast PMMA, especially under slow thermal cutting. I have seen operators blame the machine when the real villain was bargain-bin extruded sheet with protective film that curled into the kerf.
Here is the practical split:
| Material | Best Use | Cutting Behavior | Burn Risk | My Setting Bias |
|---|---|---|---|---|
| Cast acrylic | Signs, awards, display panels, polished edges | Vaporizes cleanly, glossier edge | Medium | Higher power, faster speed |
| Extruded acrylic | Budget panels, simple shapes | Melts more, edge can smear | Higher | Slightly lower power, faster movement |
| Mirrored acrylic | Decorative signage | Backing can scorch or delaminate | High | Cut from acrylic side after testing |
| Frosted acrylic | Lighting panels, privacy screens | Surface can stain easily | Medium-high | Mask carefully, clean exhaust |
| Thick acrylic, 8 mm+ | Structural displays, blocks | Heat builds in kerf | High | Slow but controlled, focus deeper |
This is where a supplier page like Bogong’s CO2 Laser Engraver Cutter becomes relevant inside the buyer journey. Not because a page can replace testing, but because acrylic work needs the right machine class: CO2 optics, stable motion, real exhaust, proper bed support, and enough wattage that you are not cooking 5 mm acrylic for an eternity.
How to Cut Acrylic With Laser Without Burning
The clean method is boring. That is why it works.
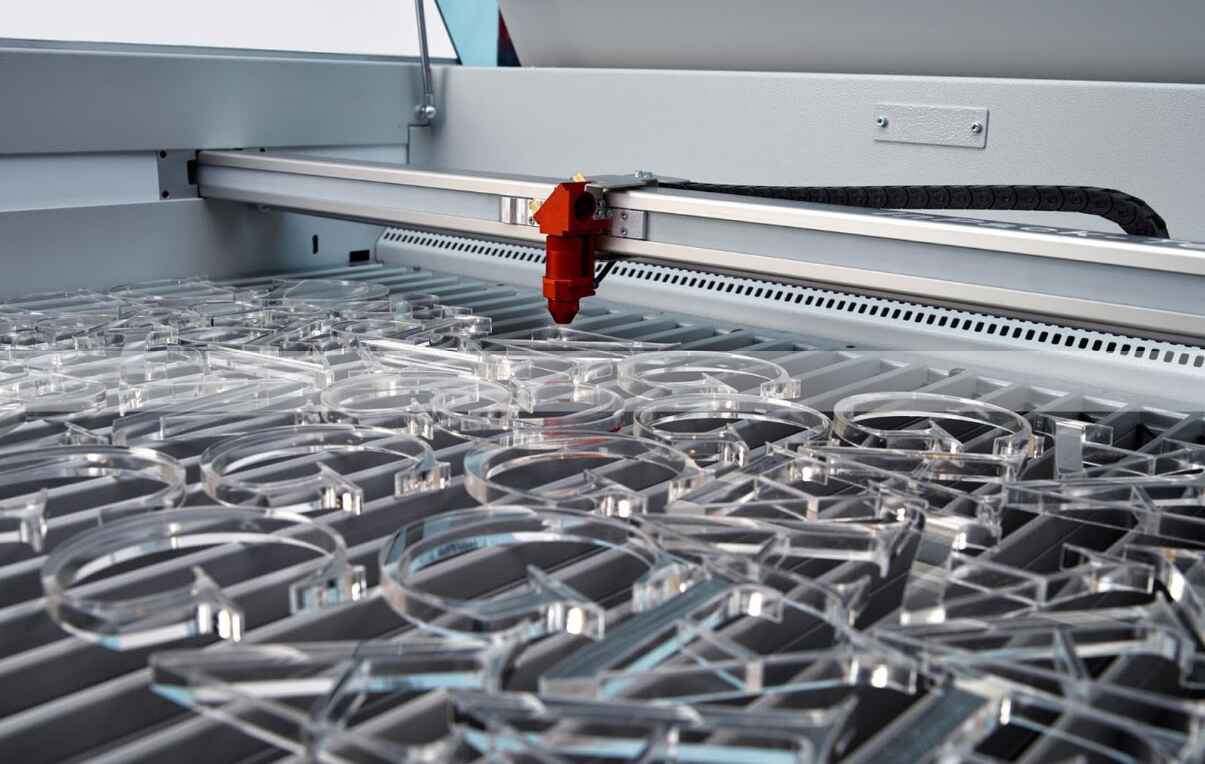
Step 1: Use the Right Bed
Honeycomb beds are convenient, but they reflect heat and smoke back into the underside of acrylic. For high-quality edges, I prefer knife blades or pin supports when the geometry allows it. Backflash marks usually come from reflected energy and trapped vapor, not evil spirits.
Step 2: Keep the Masking Honest
Paper masking can protect the top face, but it can also char at the edge. Plastic film can melt and weld itself into the cut line. If the job is cosmetic, test masked and unmasked samples before production. Do not discover the answer on a $300 sheet.
Step 3: Focus Like You Mean It
For 2–3 mm acrylic, focus near the surface. For 5 mm and above, test a slight negative focus, roughly -1 mm to -2 mm into the material. Thick acrylic needs beam waist placement that respects kerf depth, not just top-surface beauty.
Step 4: Cut Small Test Squares First
Run a 20 mm square, a 50 mm circle, and a narrow slot. Slots reveal heat buildup faster than big open contours. If the slot welds back together, you are probably too slow, too hot, poorly exhausted, or cutting extruded acrylic like it is cast.
Step 5: Record Every Pass
A shop that does not record settings is not “flexible.” It is forgetful.
For production, record material brand, thickness, color, batch, lens focal length, machine wattage, speed, power, air pressure, focus offset, room temperature, and observed edge quality. Then build your own acrylic laser cutting settings chart. The internet’s chart should only be the first suspect.
The Burn-Mark Troubleshooting Matrix
If I were auditing a shop, I would not ask, “What setting did you use?” first. I would ask, “Where is the burn mark?”
Location tells the truth.
| Symptom | Likely Cause | Fix |
|---|---|---|
| Brown top edge | Smoke not clearing, masking charring, speed too slow | Increase exhaust, reduce masking, raise speed slightly |
| Frosty edge | Too much air assist, poor acrylic grade, overcooling | Lower air pressure, test cast acrylic |
| Melted lower edge | Too slow, focus too high, bed reflection | Increase speed, lower focus, use pins or blade bed |
| Flame inside kerf | Vapor buildup, poor exhaust, excessive power | Improve extraction, reduce power slightly, clean lens |
| White haze near cut | Residue redeposition | Clean sheet, improve airflow path, remove protective film test |
| Cut fails at corners | Acceleration slowdown causing heat soak | Reduce corner power, improve ramp settings, use overcut carefully |
| Edge has vertical striations | Speed too high, tube instability, beam alignment issue | Slow slightly, inspect tube output, align mirrors |
| Parts weld back together | Heat soak or extruded acrylic melt | Faster pass, better focus, switch to cast acrylic |
This is the part where I annoy people: if your acrylic smells harsh, your exhaust is not “probably fine.” It is part of the cutting setting. The 2024 Aerosol and Air Quality Research article used a 40W CO2 desktop cutter, tested low/medium/high current settings, and examined ventilation conditions; its abstract states that ventilation control is highly recommended because it reduces particle emissions and removes gaseous contaminants. Read the 2024 AAQR laser cutter emissions study.
CO2 Laser Acrylic Cutting Settings by Machine Class
A 40W desktop CO2 machine and a 150W production CO2 machine do not belong in the same sentence unless we are talking about physics.
For a compact 40W unit, 3 mm acrylic may need slower movement and cleaner focus discipline. For a 100W or 150W system, the danger flips: too much power can turn a clean edge into a scorched trench before the operator notices. More watts buy throughput, not forgiveness.
Bogong’s broader laser cutting machine category fits readers who are comparing production scale, while the acrylic-specific page fits readers who already know their material. I would use both links in a content cluster: one for machine selection, one for material application.
40W CO2
Best for thin acrylic, prototypes, and light signage. Expect slower speeds. Keep optics spotless.
60W–80W CO2
The practical middle. Good for 2–5 mm cast acrylic, small commercial signs, display parts, awards, and craft production.
100W–150W CO2
Better for 5–10 mm acrylic and batch work. The danger is over-burning corners and narrow slots if controller power compensation is poor.
180W+ CO2
Useful for throughput and thick material, but not automatically better for thin acrylic. On 2 mm sheet, excessive power can punish you fast.
The Settings Formula I Trust More Than Any Chart
Use this testing sequence when dialing in laser power and speed settings for acrylic:
- Start with 80–90% of expected cutting power.
- Choose a speed likely to cut in one pass.
- Run a 20 mm square and inspect top, bottom, and odor.
- If it does not cut through, reduce speed by 10–15% before increasing power.
- If the edge is brown, increase speed or improve exhaust before lowering power.
- If the edge is frosty, reduce air assist.
- If the bottom flashes, change bed support.
- If the corners burn, adjust corner power or acceleration behavior.
- Repeat on a real production contour, not only a square.
Acrylic lies during test cuts.
A straight line may look perfect while a dense logo, 3 mm internal slot, or nested pattern turns into a smoky mess because the heat has nowhere to go; that is why professional testing must include the smallest internal feature in the job, the tightest radius, and the longest continuous cut path. Otherwise, what did you really test?

FAQs
What are the best laser cutting acrylic settings?
The best laser cutting acrylic settings are the lowest stable heat-input combination that cuts through in one pass while keeping smoke moving out of the kerf, usually with high CO2 laser power, controlled speed, low-to-moderate air assist, strong exhaust, and focus at the surface or slightly below it.
For 3 mm cast acrylic on a 60W–80W CO2 laser, I would often start around 75–95% power and 10–18 mm/s, then tune by edge color, lower-edge separation, and smoke staining. The correct answer is proven by test cuts, not copied from a chart.
How do I cut acrylic with a laser without burning?
You cut acrylic without burning by reducing heat soak, clearing vapor quickly, using clean optics, choosing cast acrylic when edge quality matters, controlling air assist, and avoiding bed reflection. The process works best when speed, focus, exhaust, masking, and sheet type are tuned together.
If the top edge is brown, do not immediately reduce power. Check exhaust first. If the edge is frosty, reduce air pressure. If the underside has marks, lift the acrylic off the honeycomb bed or switch to pin supports.
Why does acrylic burn during laser cutting?
Acrylic burns during laser cutting when excess heat and trapped vapor remain in the kerf long enough to char masking, stain the sheet, or ignite vapor. The usual causes are slow speed, poor exhaust, dirty optics, excessive power, bad focus, aggressive nesting, or unsuitable acrylic sheet.
The hidden cause is often corner slowdown. Your controller may reduce speed at tight curves, which raises heat input per millimeter even when your displayed speed looks reasonable.
Is air assist good for laser cutting acrylic?
Air assist is good for laser cutting acrylic when it is used lightly to move vapor out of the kerf, but too much air can frost the edge and reduce the glossy flame-polished look. Acrylic needs clean airflow, not a high-pressure blast.
For thin cast acrylic, I would test low air first. For thicker acrylic, increase air only enough to prevent flare-ups and smoke staining. Exhaust volume matters more than dramatic nozzle pressure.
Can a diode laser cut clear acrylic?
A diode laser usually struggles to cut clear acrylic because transparent PMMA does not absorb blue diode wavelengths as effectively as it absorbs CO2 laser energy. Diode lasers can cut some dark, painted, masked, or coated acrylic, but clear acrylic is a poor target for most blue diode systems.
For professional clear acrylic work, use a CO2 laser. It is not just faster; it is physically better matched to the material.
What CO2 laser power is best for acrylic?
The best CO2 laser power for acrylic depends on thickness and production volume, but 60W–80W is a practical range for 2–5 mm cast acrylic, while 100W–150W is better for thicker sheets or batch production. Higher wattage improves throughput but also increases burn risk.
For commercial acrylic signage, displays, and awards, I would rather have stable optics, good exhaust, and repeatable motion than a huge tube running sloppy settings.
Final Thoughts: Stop Guessing, Start Cutting Test Data
The best laser cutting acrylic settings are not found in one viral chart. They are built from controlled tests on your machine, your acrylic, your lens, your exhaust, and your production geometry.
Use the table above as your first pass. Then document everything.
And if your shop is moving from hobby-scale acrylic work into repeatable production, compare machine class, exhaust design, bed size, and CO2 tube power before chasing another settings PDF. Start with Bogong’s laser cutting machine for acrylic page, review the CO2 laser cutting machine options, and then contact Bogong Laser with your acrylic thickness, target edge quality, monthly volume, and sample part drawing so the recommendation is based on real cutting conditions, not brochure optimism.


Hot Click
Contact Us
Application
©Copyright [bogonglaser.com]. BOGONG Laser Machine Supplier All Rights Reserved.